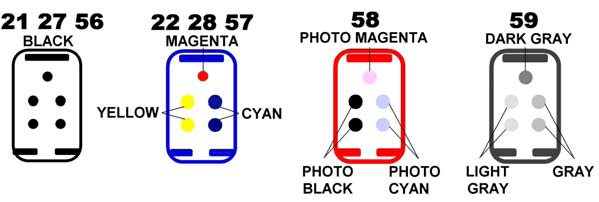
 REFILLING HP Cartridges HP21 and HP22. The physical cartridge & ink for the 21 & 22 cartridges are the same as the other cartridges listed in these instructions. The difference is how much ink you get from HP and the sponge material used in the cartridges. The sponge material in the HP21 and HP22 cartridges does not allow the cartridge to hold very much ink. When refilling the HP21 black do not attempt to inject more than 5ml and only use the top most center hole for refilling (see picture on far left—red circle). When refilling the HP22 do not use more than 2cc per color. Injecting too much ink can result in cartridge bleeding.
BLACK CARTRIDGES: C6656, C8727 & C9351 (See Refilling HP21 and HP22 in upper right corner for details)
- Remove cartridge from printer & place into cartridge clip. Insert print head first onto sponge material and slide cartridge top into clip.
- This cartridge uses a sponge material to retain ink. To get to the sponge remove the label at the top of the cartridge.
- Once you have removed the label fill your injector with 10 cc’s of ink
- Insert the injector into top cartridge chamber as show on the image above. Insert the injector as far as you can go and then draw back about 1/16th to 1/8th of an inch. (When first injecting ink into cartridge use the fill hole farthest away from you when holding cartridge as shown above left)
- Begin to inject ink into the cartridge very slowly. Remember: you are injecting into a sponge—GO SLOW. Slide the injector outward at small increments as you inject the ink. This will allow more of the sponge to quickly become saturated.
- When you see ink begin to bubble at the top of the vent hole stop injecting ink. Wait a few seconds and slowly remove the injector. Return any unused ink to its bottle. Sealing the top of the cartridge can be accomplished by reusing original label or by use of tape (scotch tape as an example).
- If cartridge accepts a complete refill then repeat using an additional 5cc. (When refilling additional ink use one of the fill holes closest to you when holding cartridge as shown above left.)
- To clean the injector draw water in and out repeatedly. A good 8-10 times will do an effective job. For more thorough cleaning remove tip and run both under a faucet.
- When finished, allow cartridge to sit in cartridge clip for several minutes before removing. This will allow ink to be absorb into the sponge.
COLOR CARTRIDGES C6657, C6658, C8728, C9352 & C9359 (See Refilling HP21 & HP22 in upper right corner for details)
- Remove cartridge from printer & place into cartridge clip. Insert print head first onto sponge material and slide cartridge top into clip.
- This cartridge uses a sponge material to retain ink. To get to the fill location you must first remove the label at the top of the cartridge.
- Use the cartridge diagrams above to determine which color you wish to refill first. MAKE SURE YOU USE THE CORRECT COLOR CODES FOR YOUR CARTRIDGE.
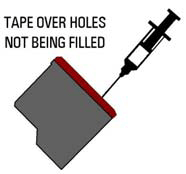
- Tape over holes that you are not going to refill.
- Once you are ready to refill, fill injector to 5cc
- Insert the injector into cartridge chamber. Insert the injector as far as you can go and then draw back about 1/16th to 1/8th of an inch.
- Begin to inject ink into the cartridge very slowly. Remember: you are injecting into a sponge—GO SLOW. Slide the injector outward at small increments as you inject the ink. This will allow more of the sponge to quickly become saturated.
- When you see ink begin to bubble at the top of the vent hole stop injecting ink. Wait a few seconds and slowly remove the injector. Return any unused ink to its bottle. Sealing the top of the cartridge can be accomplished by reusing original label or by use of tape (scotch tape as an example).
- To clean the injector draw water in and out repeatedly. A good 8-10 times will do an effective job. For more thorough cleaning remove tip and run both under a faucet.
- REPEAT process with remaining colors.
- When finished, allow cartridge to sit in cartridge clip for several minutes before removing. This will allow ink to be absorb into the sponge.
After Refilling
- Initially the cartridges may release ink. This is not uncommon when ink has been quickly injected into sponge . Allow cartridge to sit in sink or plastic container until it has stopped. Do not place the cartridge on a paper towel or anything that might draw ink out of the cartridge. DO NOT install your cartridge until the cartridge has ceased releasing ink.
- Test your printer. If you see lines in your print or incomplete print then perform several primer pages as described below. We recommend 2-3 primer prints, though more many be necessary .
- Make sure your injector is thoroughly clean and all bottles are properly sealed before storing your kit.